When I made a blog with Emacs, I decided to host my static website on AWS using CloudFormation. To understand what I was doing, I broke down what I needed to do into smaller steps. All the code in this blog post is in my GitHub Repository.
The infrastructure of my website
I designed my infrastructure to be affordable. I didn't want to spend much money on a static site. If it would cost a lot, I would just use Netlify or something similar that I can host a static site for free. So why did I choose CloudFormation? I just wanted to learn IaC (Infrastructure as Code) and try it out on my website. Also, my tiny knowledge of IaC tells me that its going to make my website easier to maintain in the future.
The AWS services I used on my website
I kind of knew in my head, but I decided to make an AWS network diagram just to make things clear for me.
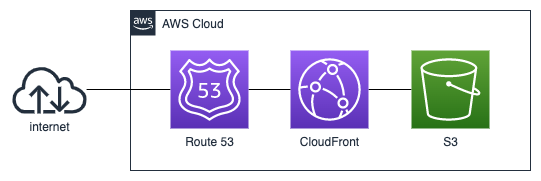
I used the following AWS services:
- Route 53 for DNS
- CloudFront for CDN
- S3 for storing website files
- AWS Certificate Manager for SSL Certificate (Not shown in the diagram)
My project was very simple when shown just the AWS Services, but I decided to add a little bit of description to make it easier to understand what's happening in the inside.
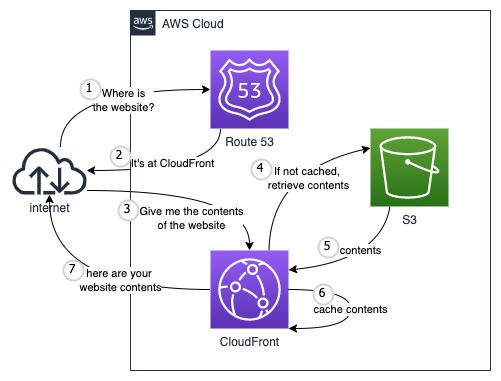
This design works for me because all I have to pay is somewhere around $0.50 per month for Route 53. Even if more users come to my site, I won't have to worry that much because CloudFront can serve 1 TB of data transfer out and 10,000,000 HTTP or HTTPS Requests for free each month!
Setting up the static website
Now its time to create the infrastructure with CloudFormation! Starting from scratch was way too hard for me so I Googled for a template similar to my infrastructure design. I found this repository on GitHub. It was basically the same thing as my design. I probably could've used this as is, but it was using multiple CloudFormation stacks and it was very complex. To make this simpler for me, I took out all the stuff I didn't really need and made it into just one CloudFormation stack.
In this part, I will create a website that serves HTML content in S3 through CloudFront. At the end of this part, I was able to access the static website through from the domain name provided by CloudFront.
Setting up an S3 bucket
First I needed a website root folder to serve the static site. This S3 configuration just creates an S3 Bucket for the website root folder.
Resources:
  WebsiteRootS3Bucket:
    Type: AWS::S3::Bucket
    Properties:
      BucketName: !Sub '${AWS::StackName}-root-bucket'
The BucketName property had to be globally unique, so I decided to prepend the bucket name with the AWS::StackName. The AWS::StackName is one of the CloudFormation Pseudo Parameter, which are parameters predefined by AWS. I'll try to remember this, as this seems useful in a lot of situations.
This is what it looks like when I create the CloudFormation stack on the AWS Management Console.
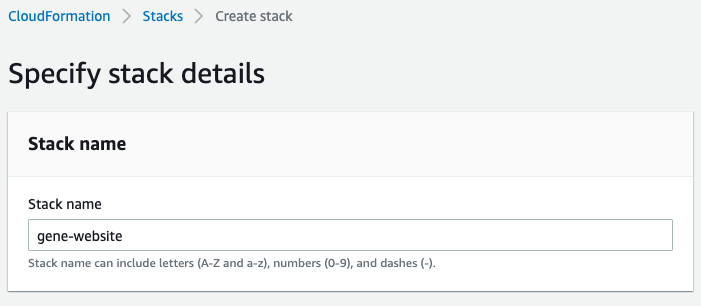
I specified it to be gene-website, so !Sub '${AWS::StackName}-root-bucket' is going to be evaluated as gene-website-root-bucket.
Setting up a CloudFront Distribution
Now that I have a S3 bucket, I need CloudFront to serve the static files. This part was harder because there were a lot of stuff going on. So I made a diagram of an overview of what AWS Resource are needed, and how they interact with each other. I didn't know making diagrams like this help me understand the infrastructure so much more. I should make this for every project.
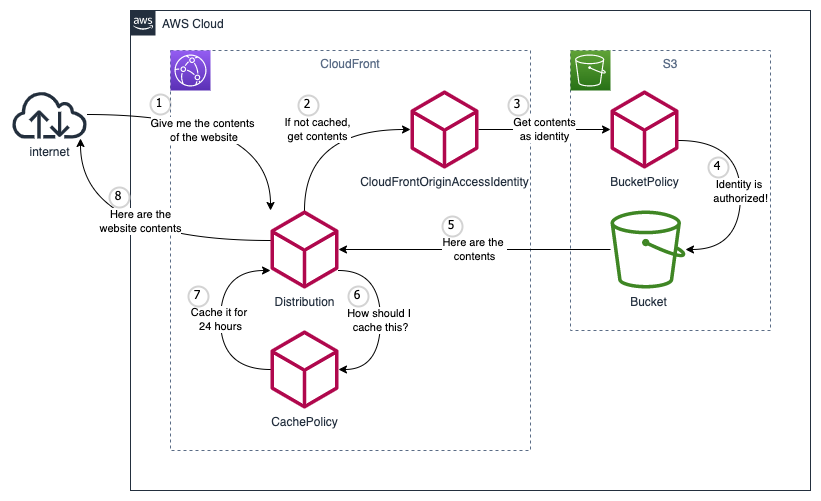
I broke it down into 3 parts to make it easier to understand.
Part 1: Create the distribution!
The center part of the CloudFront configuration is the CloudFront Distribution resource. A detailed explanation for each property is provided in the AWS documentation.
Resources:
  ...

  WebsiteCloudFrontDistribution:
    Type: AWS::CloudFront::Distribution
    Properties:
      DistributionConfig:
        Enabled: true
        HttpVersion: 'http2'
        IPV6Enabled: true
        PriceClass: 'PriceClass_All'
Part 2: Set up S3 as the origin
Setting up the S3 bucket I created previously as the origin of the CloudFront requires a few resources to be set up correctly. To be clear of what this sections describes, I'll put an image of what I want to achieve.

First you need the CloudFront Origin Access Identity resource. This will be the user that CloudFront uses to access the S3 bucket.
Resources:
  ...

  WebsiteCloudFrontOAI:
    Type: AWS::CloudFront::CloudFrontOriginAccessIdentity
    Properties:
      CloudFrontOriginAccessIdentityConfig:
        Comment: 'CloudFront OAI for website'
Next you need a S3 Bucket Policy resource that allows the origin access identity to get stuff from the S3 bucket.
Resources:
  ...

  WebsiteS3BucketPolicy:
    Type: AWS::S3::BucketPolicy
    Properties:
      # The bucket created in the previous section
      Bucket: !Ref WebsiteRootS3Bucket
      PolicyDocument:
        Version: '2012-10-17'
        Statement:
          - Action:
              - s3:GetObject
            Effect: Allow
            Resource: !Join ['', [!GetAtt WebsiteRootS3Bucket.Arn,  '/*']]
            Principal:
              # The OriginAccessIdentity created in the previous section
              CanonicalUser: !GetAtt WebsiteCloudFrontOAI.S3CanonicalUserId
          - Action:
              - s3:ListBucket
            Effect: Allow
            Resource: !GetAtt WebsiteRootS3Bucket.Arn
            Principal:
              # The OriginAccessIdentity created in the previous section
              CanonicalUser: !GetAtt WebsiteCloudFrontOAI.S3CanonicalUserId
Now that the origin access identity can access the S3 resources, I needed to set up the S3 origin in the distribution. I set it up so that the distribution uses the origin access identity to access the S3 bucket.
Resources:
  ...

  WebsiteCloudFrontDistribution:
    Type: AWS::CloudFront::Distribution
    Properties:
      DistributionConfig:
        ...
        Origins:
          - Id: 'website-root-s3'
            # The bucket created in the previous section
            DomainName: !GetAtt WebsiteRootS3Bucket.DomainName
            S3OriginConfig:
              OriginAccessIdentity:
                # The OriginAccessIdentity created in the previous section
                !Join ['', ['origin-access-identity/cloudfront/', !Ref WebsiteCloudFrontOAI]]
The CloudFront distribution can now get stuff from the S3 bucket!
Part 3: Set up the default behavior
Now that the communications with the S3 bucket is established, a default behavior is required to be set up for CloudFront to start working. The CloudFront Cache Policy describes how stuff are cached.
Resources:
  ...

  WebsiteCloudFrontCachePolicy:
    Type: AWS::CloudFront::CachePolicy
    Properties:
      CachePolicyConfig:
        Name: Sub '${AWS::StackName}-cache-policy'
        Comment: 'CachePolicy for website'
        DefaultTTL: 86400 # in seconds (one day)
        MaxTTL: 31536000 # in seconds (one year)
        MinTTL: 1 # Must be at least 1
        ParametersInCacheKeyAndForwardedToOrigin:
          CookiesConfig:
            CookieBehavior: 'none'
          EnableAcceptEncodingBrotli: true
          EnableAcceptEncodingGzip: true
          HeadersConfig:
            HeaderBehavior: 'none'
          QueryStringsConfig:
            QueryStringBehavior: 'none'
The Name property had to be globally unique, so I decided to prefix it with the stack name by using the pseudo parameter again. The setting is the same as one of the managed cache policy, which is explained in the docs. It is the same as the CachingOptimized managed cache policy. I didn't really need a specialized caching behavior so I used the same configuration as this one. I could have just used the CachingOptimized managed cache policy ID (it's in the docs) and skip creating this cache policy, but I wanted to be able to see how stuff are cached in the code.
I set up the default behavior with my new cache policy like this.
Resources:
  ...

  WebsiteCloudFrontDistribution:
    Type: AWS::CloudFront::Distribution
    Properties:
      DistributionConfig:
        ...
        DefaultCacheBehavior:
          # The cache policy created in the previous section
          CachePolicyId: !Ref WebsiteCloudFrontCachePolicy
          Compress: true
          # The id of the origin created in the previous section
          TargetOriginId: 'website-root-s3'
          ViewerProtocolPolicy: 'redirect-to-https'
        DefaultRootObject: 'index.html'
        CustomErrorResponses:
          - ErrorCachingMinTTL: 60
            ErrorCode: 404
            ResponseCode: 404
            ResponsePagePath: '/404.html'
This configuration makes the CloudFront distribution to look for files in the S3 bucket by default. It also define which page to show at the root path, and which page to show when the user gets a 404 response.
I can now access my static site! I was able to access the site by accessing the Distribution domain name. It was in the AWS Management Console in the CloudFront service page.
Making CloudFront accessible from my domain with CloudFormation
Now that CloudFront is set up, I want to access it from genenakagaki.com. In order to do this I need to configure Route 53 (AWS) and AWS Certificate Manager. At the end of this section I was able to access the CloudFront from genenakagaki.com.
Setting up Route 53
In order to access CloudFront from my domain, I needed to make Route 53 point to the CloudFront distribution for the genenakagaki.com domain.
Resources:
  ...

  WebsiteRoute53RecordSetGroup:
    Type: AWS::Route53::RecordSetGroup
    Properties:
      HostedZoneName: 'genenakagaki.com.'
      RecordSets:
      - Name: 'genenakagaki.com'
        # This is for IPv4
        Type: 'A'
        AliasTarget:
          DNSName: !GetAtt WebsiteCloudFrontDistribution.DomainName
          EvaluateTargetHealth: false
          # The  following HosteZoneId is always used for alias records pointing to CF.
          HostedZoneId: 'Z2FDTNDATAQYW2'
      - Name: 'genenakagaki.com'
        # Required for IPv6
        Type: 'AAAA'
        AliasTarget:
          DNSName: !GetAtt WebsiteCloudFrontDistribution.DomainName
          EvaluateTargetHealth: false
          # The  following HosteZoneId is always used for alias records pointing to CF.
          HostedZoneId: 'Z2FDTNDATAQYW2'
One thing to be careful is the HostedZoneName. The dot (.) at the end of the domain name is required. If it's not there, CloudFormation is going to complain that it can't find the Hosted Zone. For the Route 53 Record Set, a detailed guide of what you need to configure is in the AWS documentation. This configuration points IPv4 and IPv6 requests to genenakagaki.com to the CloudFront distribution.
Now that Route 53 is configured, I needed to configure CloudFront to be able to handle HTTPS requests.
Setting up HTTPS requests to CloudFront
First I needed an SSL Certificate.
Parameters:
  HostedZoneId:
    Description: HostedZoneId for the domain e.g. Z23ABC4XYZL05B
    Type: String

Resources:
  WebsiteCertificate:
    Type: AWS::CertificateManager::Certificate
    Properties:
      DomainName: 'genenakagaki.com'
      DomainValidationOptions:
        - DomainName: 'genenakagaki.com'
          HostedZoneId: !Ref HostedZoneId
      ValidationMethod: DNS
I needed to specify a Hosted Zone to verify the SSL certificate, but I decided not to make the Hosted Zone in this CloudFormation template. Since I am planning on making multiple projects in the same Hosted Zone, having the Hosted Zone living in this particular project would be confusing to the future me.
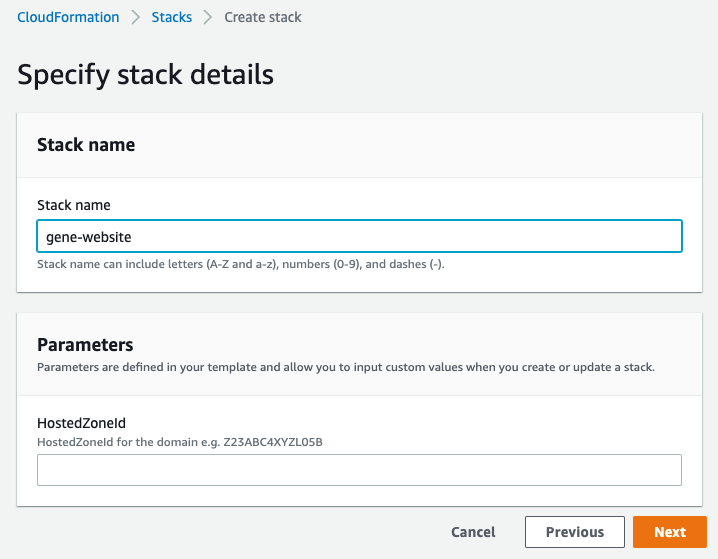
The Parameter adds a new input box when you create the CloudFormation stack on the AWS Management Console. Mine looked something like this.
Now that I have an SSL certificate, I needed to tell CloudFront to use that certificate.
Resources:
  ...

  WebsiteCloudFrontDistribution:
    Type: AWS::CloudFront::Distribution
    Properties:
      DistributionConfig:
        Aliases:
          - 'genenakagaki.com'
        ...
        ViewerCertificate:
          # The Certificate created in the previous section
          AcmCertificateArn: !Ref WebsiteCertificate
          MinimumProtocolVersion: 'TLSv1.1_2016'
          SslSupportMethod: 'sni-only'
After setting the Aliases and ViewerCertificate, I was able to create the CloudFormation stack and access CloudFront from https://genenakagaki.com!